Top X+1 things to do after installing Zorin OS 16

  1. Install and use Fish Shell - fish is a smart and user-friendly command line
    shell for Linux, macOS, and the rest of the family.

What’s Special About fish?

Easy to understand and use

Unlike the other shells that need a lot of setting-up to work the way you want them to, fish works perfectly right out of the box.

It ships with the most widely used features already included, which are present when you start using it without needing to install any additional plugins or tweak any configuration files unless you want to. Its syntax is simple, clean, and consistent.
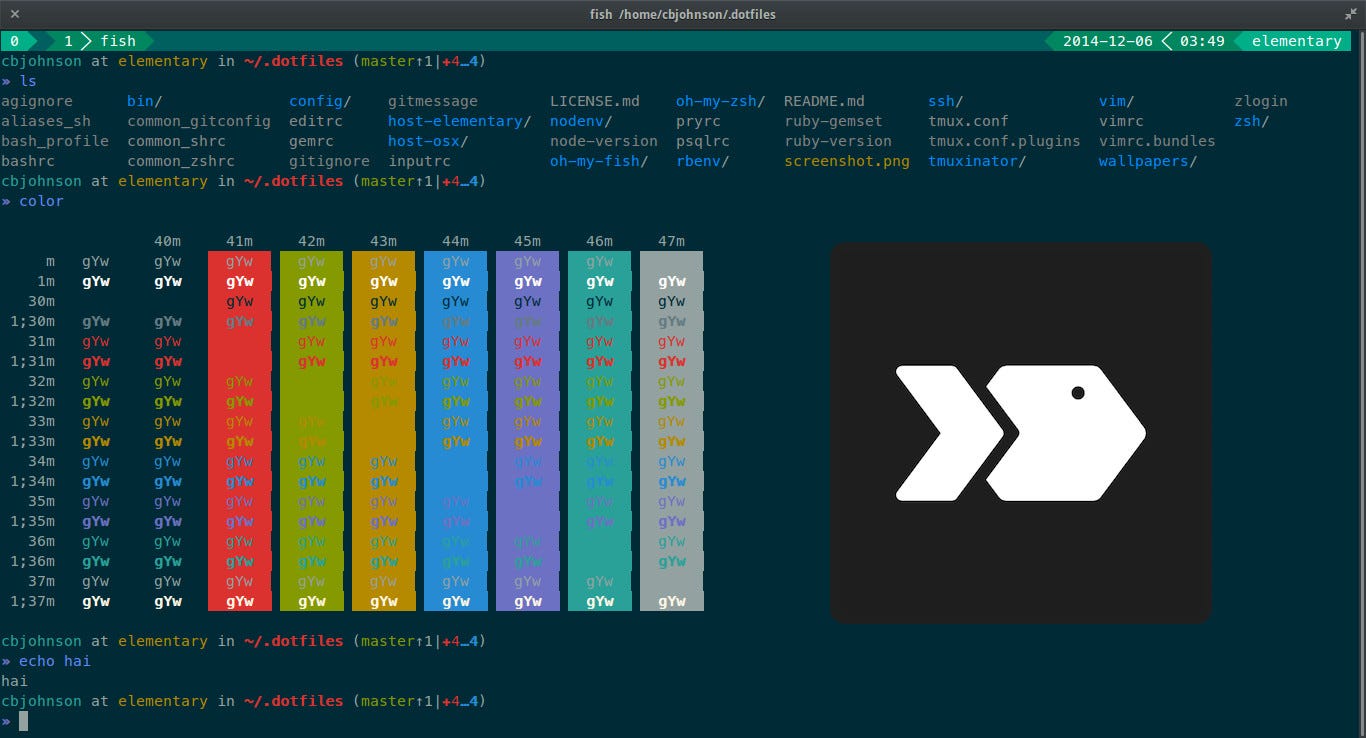
Syntax highlighting

Syntax highlighting is a feature that we all wish our CLI could perform. It saves a lot of time and frustration. Well, fish does it, and it does it pretty well.

It shows you whether your command or the directory to be searched exists before you even hit enter. You’ll know whether you’re typing anything wrong before you hit enter. This makes it easier for people to parse commands, and find errors.

It highlights (most) errors in red, such as misspelled commands, misspelled options, reading from non-existing files, mismatched parenthesis and quotes, and many other common errors.

It also features highlighting of matching quotes and parenthesis. Oh, and it’s pretty, colorful.

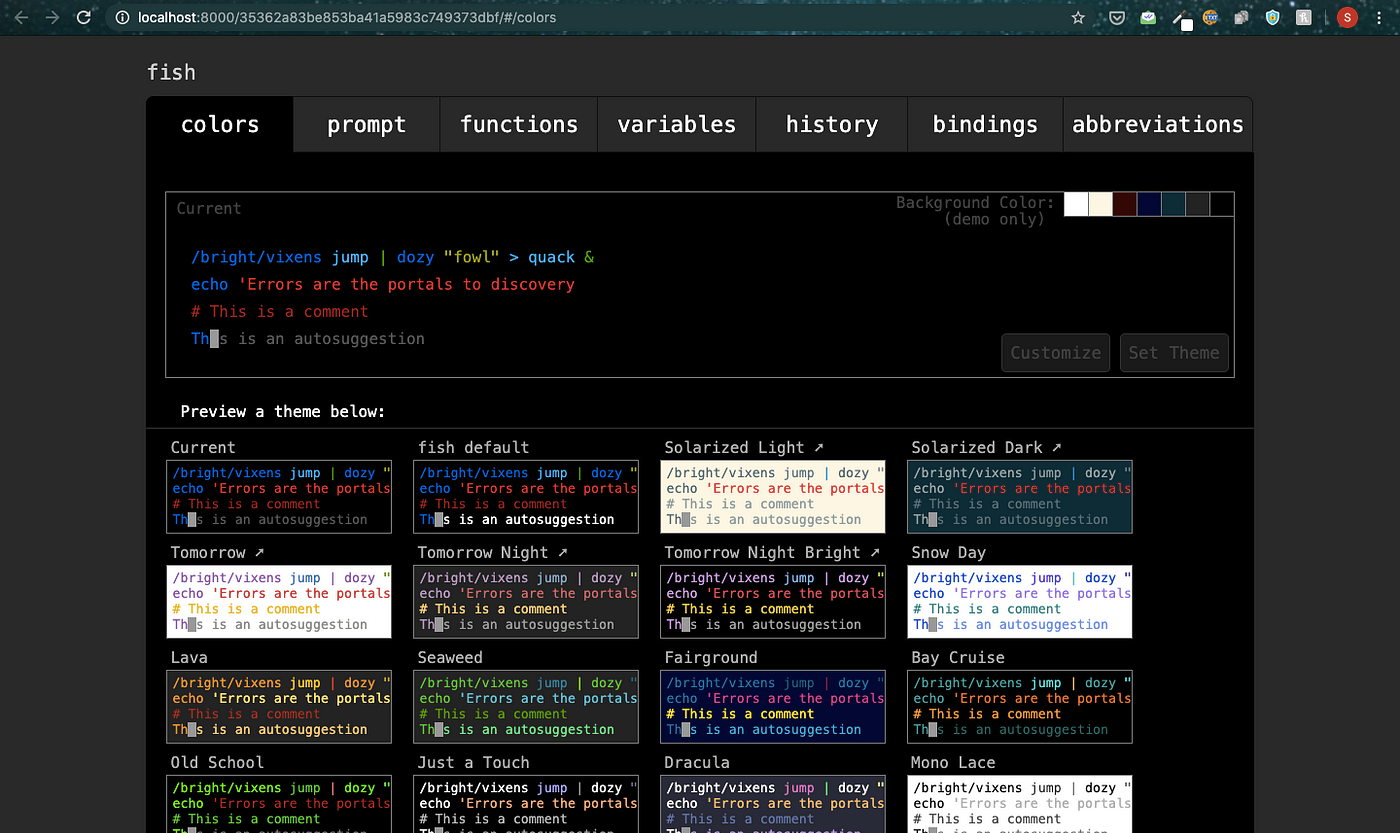
Configuration for fish shells

The fish community maintains Oh My Fish, which is a shell framework inspired by Oh My Zsh. It offers a lot of beautiful prompt themes and awesome plugins, is lightweight, awesome, and easy to use.

It also offers a web-based configuration feature. Just type:

fish_config

You will land on the website with which you can customize the skin of your shell.

Inline searchable history

This is an interactive feature of this Shell. You begin typing a command and press the up key to see all the times in the Shell history where you used that command before.

To search the history, simply type in the search query, and press the up key. By using the up and down arrow, you can search for older and newer matches. The fish history automatically removes duplicate matches and the matching substring is highlighted.

These features make searching and reusing previous commands much faster.

Inline auto-suggestion

Fish suggests commands as you type and shows the suggestion on the right of the cursor, in grey. If you mistype a command, it will show in red to indicate that it’s an invalid command.

It also suggests the most frequently used commands and auto-completes while you type, based on your history and valid files available.

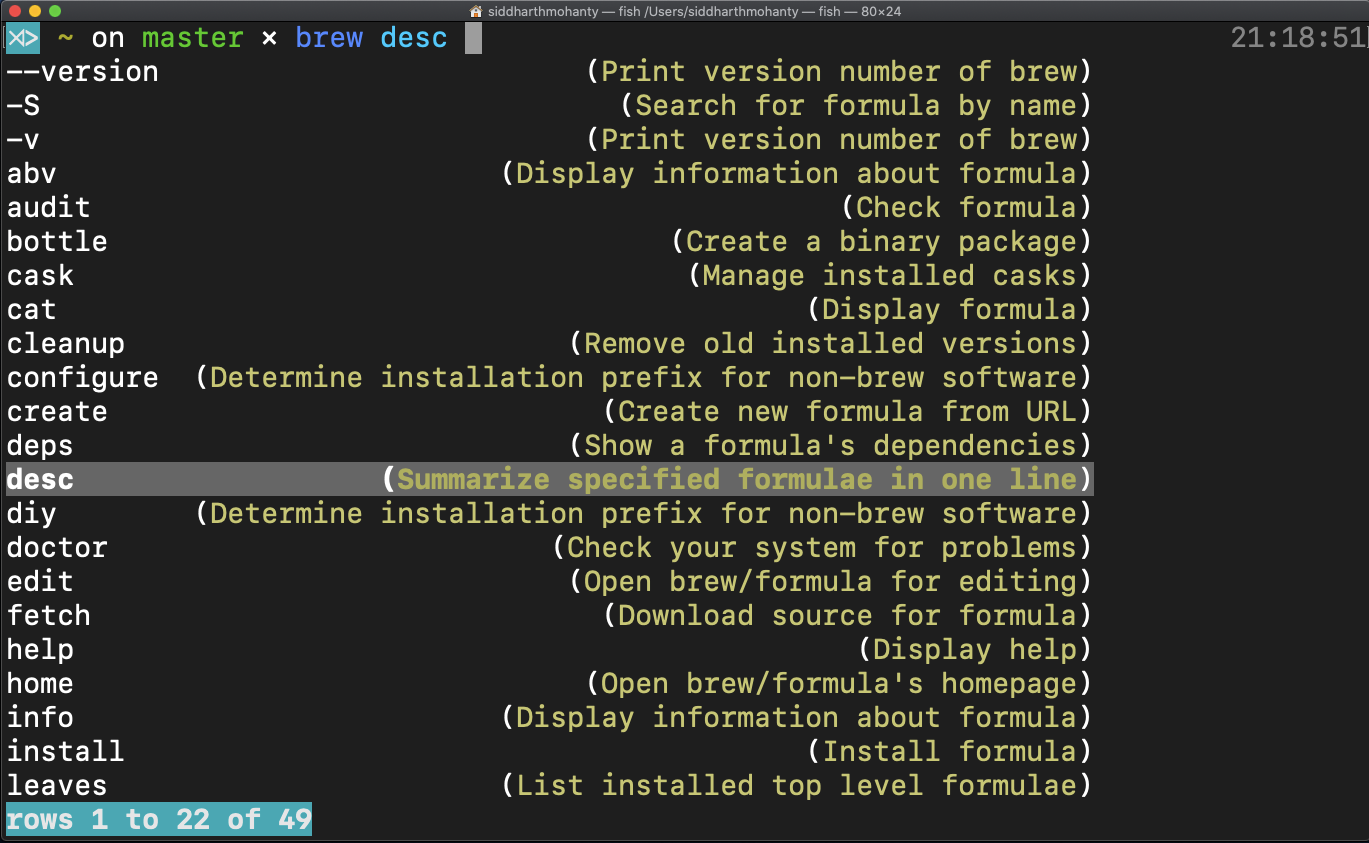
Tab completion using man page data

Fish can parse CLI tool man pages in various formats. Type in a command and “tab” through all the suggested auto-completions.

Steps to install and use Fish Shell

sudo apt install fish

Once the installation is completed, you can start using it by switching your current shell to Fish, for that type-

fish

Set Fish as Default shell

After using some time, if you like this colorful and friendly shell, then you can set it system default instead of bash.

chsh -s /usr/bin/fish

Log out of your system and log in again to apply the changes.

Customization

To change Fish properties, we can create a configuration file-

nano ~/.config/fish/config.fish

Switch back to Bash

If you didn’t like Fish and want back your Bash again on the terminal, then run

chsh -s /usr/bin/bash

log out and log in again.

To learn more about this shell command see the official documentation.

source: Command to Install fish shell on Ubuntu 20.04 LTS - Linux Shout

8 Likes
  1. Install and Use Gdu Disk Usage Analyzer - Linux has plenty of tools and commands for checking disk utilization. Some of these tools and commands come pre-installed. Take a look at the following list of commands for checking disk usage information, these can be found on many Linux distros by default:

df: shows usage for file system disk space.
du: estimates disk usage for files, directories.
ls -al: displays all the contents of a folder.
stat: shows the status of a file and file system.

Ubuntu also has a GUI-based tool called ‘Disk Usage Analyzer’ for analyzing disk usage. Likewise there is another tool ‘GDU Disk Usage Analyzer’ to view disk usage on many Linux-based distros and macOS.

GDU is written in ‘Go’ language and the official GitHub page frames it as ‘Pretty fast disk usage analyzer’ particularly for SSDs. It also works for HDDs but the performance is not as efficient as in SDD.

20 ...

1 Like
  1. Install BpyTop - BpyTop is a Linux command-line utility for resource monitoring. It shows usage and stats for processors, memory, disks, network, and processes. So, if you enjoy working with Terminal, it could be useful for you to monitor your system resource usage. BpyTop is the python version of bashtop and licensed under Apache License 2.0. Using this utility allows you to have a dynamic real-time view of a running system.

Full Article: Tutorial Install BpyTop on Ubuntu / Centos / Debian - Eldernode Blog

21 ...

4 Likes
  1. Install and use Ventoy - an open source tool to create bootable USB drive for ISO/WIM/IMG/VHD(x)/EFI files.

With ventoy, you don't need to format the disk over and over, you just need to copy the image files to the USB drive and boot it. You can copy many image files at a time and ventoy will give you a boot menu to select them.
x86 Legacy BIOS, IA32 UEFI, x86_64 UEFI, ARM64 UEFI and MIPS64EL UEFI are supported in the same way.
Both MBR and GPT partition style are supported in the same way.
Most type of OS supported(Windows/WinPE/Linux/Unix/ChromeOS/Vmware/Xen...)
730+ ISO files are tested (List). 90%+ distros in distrowatch.com supported (Details).

Official Website: https://www.ventoy.net

22 ...

5 Likes

6 posts were split to a new topic: Discussing Top X+1 things to do after installing Zorin OS 16

In order to keep the Tutorials & Guides clean for easy access to the processes presented.

Please reserve comments regarding posts in this thread to the Discussing Top X+1 things to do after installing Zorin OS 16 or Troubleshooting Top X+1 things to do after installing Zorin OS 16 if you are having issues.

Please reserve comments regarding posts in this thread to the Discussing Top X+1 things to do after installing Zorin OS 16 or Troubleshooting Top X+1 things to do after installing Zorin OS 16 if you are having issues.

1 Like
  1. Install timeshift-autosnap-apt - Timeshift auto-snapshot script which runs before any apt update|install|remove command using a DPkg::Pre-Invoke hook in APT. Works best in BTRFS mode, but RSYNC is also supported (on ext4 might be slow though, but your system is automatically snapshot before upgrade/install)

Features

  • This script is a fork of timeshift-autosnap from the AUR, but adapted for usage with the APT package manager of Debian or Ubuntu based systems.
  • Creates Timeshift snapshots with a unique (customizable) comment.
  • Keeps only a certain number of snapshots created using this script.
  • Deletes old snapshots which are created using this script.
  • Makes a copy with RSYNC of /boot and /boot/efi to /boot.backup before the call to Timeshift for more flexible restore options.
  • Can be manually executed by running sudo timeshift-autosnap-apt.
  • Autosnaphots can be temporarily skipped by setting "SKIP_AUTOSNAP" environment variable (e.g. sudo SKIP_AUTOSNAP= apt upgrade)
  • Supports grub-btrfs which automatically creates boot menu entries of all your btrfs snapshots into grub.
  • For a tutorial how to use this script in production to easily rollback your system, see System Recovery with Timeshift.

Full Article and Installation: GitHub - wmutschl/timeshift-autosnap-apt: Timeshift auto-snapshot script for Ubuntu and Debian based systems which creates snapshots of your system with timeshift before a package install, remove or upgrade using DPkg::Pre-Invoke hook in apt. Fork of timeshift-autosnap from AUR.

23 ...

1 Like
  1. Install a good email client - Mailspring.

Mailspring is beautiful, user-friendly, and works how you expect it to work. It's also fast and has all sorts of features that are very useful, like the ability to cancel sending e-mails a few seconds after you send them, also:

  • Multiple accounts (IMAP & Office 365)
  • Touch and gesture support
  • Advanced shortcuts
  • Lightning-fast search
  • Undo send
  • Unified Inbox
  • Read receipts, link tracking, and more
  • Mac, Windows, and Linux support
  • Themes and layouts (including dark mode)
  • Localized into 9 languages

Install from Software app or mailspring website Mailspring - The best free email app

24 ...

1 Like
  1. Install Ferdi (suggested by @Elegant_Emperor )

All your services in one place

Ferdi is a messaging browser that allows you to combine your favourite messaging services into one application.

25 ...

3 Likes
3 Likes
  1. Install Panel OSD gnome shell extension - Configuring where on the (main) screen notifications will appear, instead of just above the message tray

26 ...

3 Likes
  1. VLC Media Player. Best video player. TODAY'S BEST DEALS. ...
  2. Converseen. Best image editor. ...
  3. Synaptic Package Manager. Best package manager. ...
  4. Krita. Best raster graphics editor. ...
  5. digiKam. Best photo manager. ...
  6. Bitwarden. Best password manager. ...
  7. CopyQ. Best clipboard manager. ...
  8. Caffeine. Best lock-screen control utility.
    100 Best Ubuntu Apps
2 Likes

@Aravisian maybe merge the topic with this one 20 things to do after installing Zorin 16 - #9 by StarTreker

About the same subject ?

1 Like

That is a good suggestion and they are very similar.
That thread is covering a particular video guide and it's suggestions, whereas this one is aimed toward user suggestions. Merging them may also get confusing as the timestamps of the postings would really spread them out through the thread.
There is a splinter thread to this one, also... on Discussing the topics of this thread, since it was getting pretty filled by non-suggestions.

1 Like

You can try out apt-fast. apt-fast is a shell script wrapper for “apt-get” that improves updated and package download speed by downloading packages from multiple connections simultaneously. If you frequently use terminal and apt-get to install and update the packages, you may want to give apt-fast a try. Install apt-fast via official PPA using the following commands:

sudo add-apt-repository ppa:apt-fast/stable
sudo apt-get update
sudo apt-get install apt-fast

Then head over to here for help with configuring it.

6 Likes

A post was merged into an existing topic: Discussing Top X+1 things to do after installing Zorin OS 16

Please reserve comments regarding posts in this thread to the Discussing Top X+1 things to do after installing Zorin OS 16 or Troubleshooting Top X+1 things to do after installing Zorin OS 16 if you are having issues.

Disable EXT4 Journaling

If you are using an SSD or NVMe drive I recommend you turn off journaling. EXT4 is a journaling filesystem. Meaning it keeps track of changes on your system (app installs, config changes, new files of all types) in case something gets corrupt or interrupted. This doesn't sound like a bad thing, but this is done every few minutes. If you are using your system all day, it won't be long before you use a few thousand writes to the drive. This is important in SSD and NVMe drives because they are limited to a certain number of read and write operations. To reduce the number of writes the system is doing, we can disable this feature. By disabling the feature you increase the chance of corrupt files if you have to hard reset your system. I would make sure everything is working and you have no freezes prior to executing this step.

This must be done with the partition unmounted, so you will need to boot back into the live image or, take note of the /dev/ in disks before rebooting, and you can press 'c' at the grub menu to perform this operation.

Once everything is setup and working properly, reboot and press 'c' at the grub menu. You will be given a command prompt. Here you will type:

tune2fs -O ^has_journal /dev/<drive-n-partition-id>

What is this doing? tune2fs is a built in command that allows you to adjust features available for the partition/drive.
The -O (that is a capital O) tells the command that you want to change an option.
The ^ in front of has_journal tells the command that you are disabling/removing the feature attached to it....in this case, has_journal.
The last part is the patition/disk that you are changing.
An example for my drive, being NVMe is:

tune2fs -O ^has_journal /dev/nvme0n1p4

After you boot into Zorin again, you can run the terminal and the following command to ensure it is disabled:

sudo debugfs -R features /dev/<drive-n-partition-id>

You will get the following output:

As you can see, has_journal is not in the listing.

2 Likes

Some folks don't recommend turning off the journaling.
Here is what they say:
https://forums.linuxmint.com/viewtopic.php?t=293779

They also posted:

8 posts were merged into an existing topic: Discussing Top X+1 things to do after installing Zorin OS 16

The considerable range in the lifetime of an SSD is related to different storage technologies:

  • Single-level cell SSDs (SLC) have a particularly long life, although they can only store 1 bit per memory cell. They can withstand up to 100,000 write cycles per cell and are particularly fast, durable, and fail-safe.
  • Multi-level cell SSDs (MLC) have a higher storage density and can store 2 bits per flash cell. They are more cost-effective than the SLC type but can only tolerate up to 10,000 write cycles per cell.
  • Triple-level cell SSDs (TLC) can hold 3 information bits per memory cell. However, at the same time, life expectancy can drop to 3,000 memory cycles per cell.
  • Quad-level cell SSDs (QLC) accommodate 4 information bits per cell. Reduced costs, more storage capacity, and higher storage density are also associated with a shorter service life with this type of device. Manufacturers usually only guarantee 1,000 write or erase cycles per cell.

Although the range in SSD life spans is considerable, all SSD types have a sufficiently high life expectancy with moderate use (with some limitations, including for QLC SSDs).

So in addition to what is posted above you have to consider this as well. They say 10 years is the long end of a avg user

I thought about the cost of my SSD and the breakdown over its lifetime to be fair for cost and replacement within that range fair

3 Likes