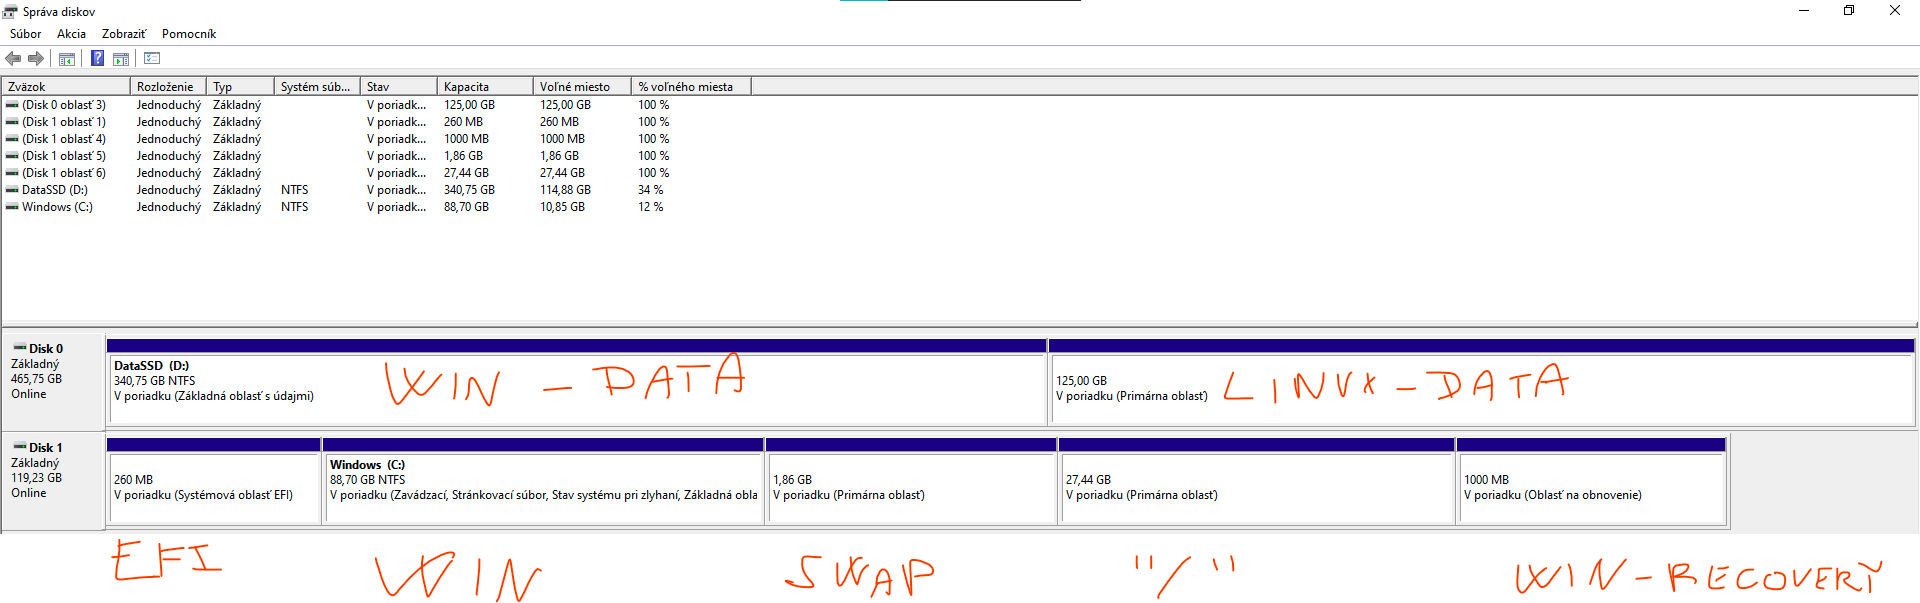
Hi, I would like to ask if there is any safe way to just copy my "/" root partition to a new disk. As you can see on the image I have two disks: 128GB NVMe SSD and 512GB SATA SSD. I am dualbooting Zorin os 16.2 Core with Windows 10 and I have my disks partitioned in very weir way
My GRUB is installed in the EFI partition along side with windows boot loader and i would like to move/copy my "/" partition to the 128GB of free space basically on the SATA drive. I would like to delete swap because i have no use of it and delete the "/" partition on the 128GB NVMe disk so windows can have the whole 128GB because i am running of space and my linux partition need space to i have probably like 5 GB of free space there and i would like to use it in normal way. So is there any completely safe way to do it ? I was thinking just using live iso with gparted and copy the partition to new disk and then delete it and swap too, then resize the windows partition in windows and have working machine or would there be any problems for example with that grub wont find the linux OS when it is on the new disk if any update is needed or if i need to install grub on the second disk too.
Ok, let's think about this... not sure if this would work.
Boot the Zorin OS USB stick and select "Try Zorin".
Use the Disks (gnome-disks) application to create a .img file of each partition on each drive. Save all of those .img files to an external USB drive with descriptive names so you know what each one is.
Then find the exact size down to the byte of each of those .img files, and wipe both drives. Set up partitions on each drive correlating to the exact size of the .img file you'll 'burn' to that partition (it'll likely be slightly larger, but it cannot be smaller).
Use the Disks application to 'burn' the .img files to their respective partitions.
Change the boot order in BIOS to point to the new EFI partition. You'll likely have to change Grub and the Windows bootloader, too... not sure if you can do that before you shut down Zorin OS and Windows the last time before you do the procedure above, so as soon as you're done 'burning' the .img files to the partitions and you reboot, it all works.
But like I said... not sure if that would work.
But you've got a record of the old disk layout in the image above... if it doesn't work, you can partition the drives as they were originally, and 'burn' those .img files back onto those partitions and be back to your original setup. The size of each partition is the same as the size of each .img file, so you know how big to make the partitions if you need to revert.
In addition to what @Mr_Magoo suggested, you might find the below steps helpful.
Boot the system using a Live USB or CD.
Backup important data. You might also consider doing this with other tools like "Timeshift" or the "Backups" tool while not running from your Live USB as well - just so you have a snapshot to go back to if this doesn't go as planned for you.
Note: The steps below are to guide you in this process and among the examples of commands to run or tools to use, I am also using example partition labels; so you should make sure you use labels or commands which apply to your system configuration and partition layout. For instance, you might already have a device with a partition label of /dev/sdb1. In that case, you should look at your partitioning layout to determine how to proceed. Though I did take some time to fact-check myself, I also am not an expert by any means, this info is just a compilation of info and steps I've previously been forced to take at one point. For the sake of your sanity, take some time and try to make sure you have a good understanding of the Linux system partition layouts and boot processes.
Open a terminal and use the "lsblk" command to identify the device names and partition layouts of the disks.
Make sure you know which disk is the source and which disk is the target. Based on your image I see:
Disk 1 with the EFI partition and GRUB installed.
Disk 0 with "128GB" of free space.
You can a tool like GParted to create a new partition in the 128GB space on Disk 0, which will be the target for the root partition.
For instance; you can name the new partition on Disk 0 as /dev/sdb1 if that label is not already used.
Format the new partition created above. Likely ext4.
Make sure the partition size is larger than the used space on the source partition.
Also make sure you format the partition with the same filesystem as the source partition.
Still in Live USB, mount both the source and target partitions to a temporary mount point, e.g. create a new directory called /mnt/newroot.
You can use GParted or Terminal for this, take note that examples for both methods are provided below for your preference:
In GParted: locate the new partition you made: /dev/sdb1, right click on it and select "Information".
Take note of the new partition's UUID and close the info window. Then right click on the partition again and select "Mount".
In the "Mount Point" field, type in the path to the temp. mount point you created earlier: /mnt/newroot.
In the "Options" field you should type in the mount options: defaults,x-mount.mkdir,umask=000.
defaults specifies the default behavior of the file system, including -rw access,
x-mount.mkdir for the mount point to be created if it doesn't already exist,
umask=000 sets the default permissions (no restrictions, full access) for files and directories on the file system.
Click "OK" to mount new partition to the temp. mount point.
Check to verify that it was mounted correctly by running mount and looking for the mount point path you specified for /dev/sdb1.
An easier way might be df -h /mnt/newroot
In terminal, you can run: mount /dev/sdb1 /mnt/newroot which will only mount the new partition /dev/sdb1 to the temp directory you labeled /mnt/newroot.
You might prefer the same defaults and permission settings/options as described in the GParted method above. For that, you can run: sudo mount /dev/sdb1 /mnt/newroot/ -o defaults,x-mount.mkdir,umask=000 which takes care of it all in one command.
You can use a tool like the "rsync" command to copy the files from the source partition to the target partition. You can also use GParted. Methods for both are below:
Be sure to use the appropriate options to preserve ownership, permissions, and other metadata.
In GParted: right click on the new partition, /dev/sdb1 and select "Copy".
Select the unallocated space you have on Disk 0 and right-click on it. Then select "Paste". You can also adjust the size of the new partition on Disk 0 as needed.
Click on the "Apply" button in the toolbar to start the copying/moving process.
Using Terminal and rsync command:
The command sudo rsync -avx --exclude='/dev/*' --exclude='/proc/*' --exclude='/sys/*' --exclude='/tmp/*' --exclude='/run/*' --exclude='/mnt/*' --exclude='/media/*' --exclude='/lost+found' / /mnt/newroot will copy all the files and directories from your current root (/) partition to the temporary directory (/mnt/newroot), which is where your new partition (/dev/sdb1) is located, all while excluding some directories that are not necessary for the new system to function properly.
Once the copy is complete, update the target partition's /etc/fstab file with the new partition UUID, filesystem type, and mount point.
While in the new partition you created which is mounted to the temp. directory, you should edit the /etc/fstab file which you copied from the old root partition, to reflect the new UUID of the new partition.
You can find the new UUID by running the blkid command on the new partition, like this: sudo blkid /dev/sdb1
The output should look something like /dev/sdb1: UUID="12345678-1234-1234-1234-1234567890ab" TYPE="ext4"
Copy the UUID value and replace the UUID value for the old root partition in /etc/fstab.
Update the /boot/grub/grub.cfg file to include the new partition. You can use the sudo update-grub command to automatically update the grub.cfg file.
Use a tool like "efibootmgr" to update the EFI boot entries on Disk 0 to include the new partition.
An example command for creating a new entry in the EFI bootloader with the label of "Zorin (new root) and which points to the grubx64.efi file in the new root partition would be: sudo efibootmgr -c -d /dev/sdb -p 1 -L "Zorin (new root)" -l '\EFI\ubuntu\grubx64.efi'
You can use a third-party boot manager like I've done in the past. rEFInd or Clover are handy GUI tools for managing the boot entries and to update the bootloader, but you might need to install and configure/customize them first.
You can also manually edit the EFI bootloader configuration files, but that is not generally recommended.
Note: After you have finished copying the files and updating the bootloader, make sure to unmount the partition from the temporary mount point before rebooting. You can do this by right-clicking on the partition in Gparted and selecting "Unmount".
Test your changes to your machine by rebooting and selecting the new entry in the EFI boot menu.
Thanks a lot for suggested solutions. It look like quite a work though. I am probably going for and easy solution and it is just backing up config files/dot files and reinstalling whole distro. I thought it would be much easier something like copy/paste just with updating GRUB and EFI. But again thanks a lot guys. Maybe sometime I this as a tutorial.
So now i have probably last question and it is what would be better. Have 1 EFI on 128GB disk and 1 EFI on the 500GB disk and have the whole 128GB for windows and the 500GB would be 150GB for linux (root, home, swap) and the the rest would be for windows data OR have 1 EFI for the whole laptop and manage it that way.
It looks like with just one EFI there are not complications so I am going to use just one as I am using right now. I don't mind seeing GRUB everytime like now. I just customized it with theme and have only 4 seconds to choose what to boot with defaulting to Windows because of school. I would like to use Linux as my daily driver but sadly some old programs does not work.