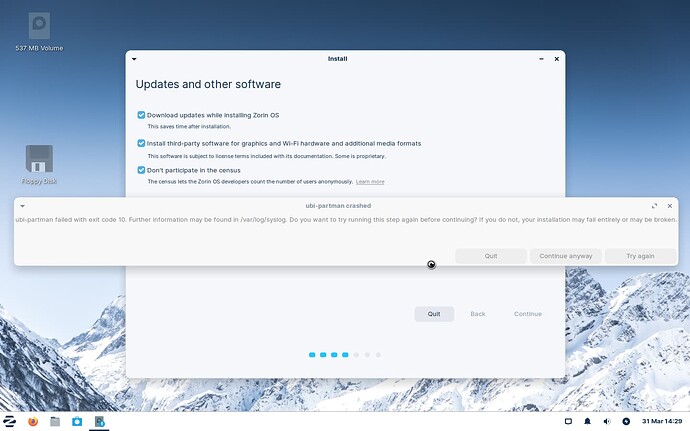
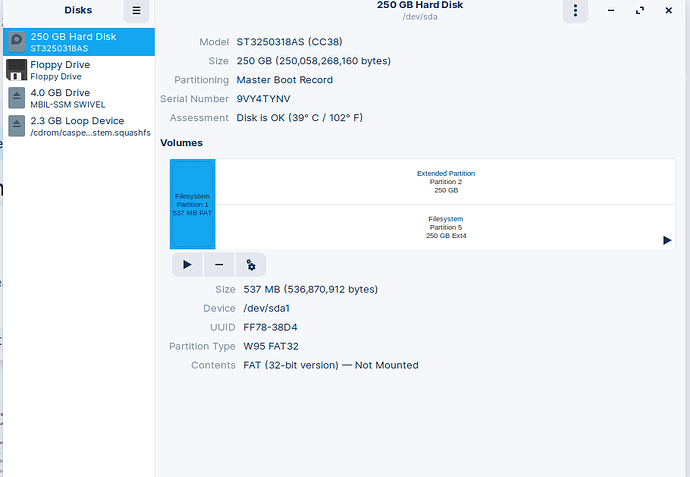
can you highlight the ext4 partition To show the device ID like ( dev/sda2)
Did you install to that device ID?
Other things to try:
Try Rufus instead of balenaEtcher
Also run a checksum on the download,
Click the arrow to mount the partition ( the play button)
& make sure you direct the install to dev/sda5.
If you dont want the partitions then select (erase disk & install) Make sure both/all partitions are mounted first.
That's difficult especially out of the gate before installation; going in a bit hard here but I believe the below will help others to help you a bit faster:
Sharing the relevant output of
less /var/log/syslog
would be helpful to isolate this problem, and provide much better information by comparison to the pop-up.
- Open a terminal
ctrl-alt-t - type, or copy paste:
tail -f /var/log/syslog - reproduce the error by going back or trying again
- copy the output either in thread or to a pastebin and share the output here
I've done a little homework because I was curious and figured this would be helpful if I ever run into the same problem. I've gone through a few installation processes due to hiccups experienced during setup or installation, but haven't run into this exact issue; so it's a learning process for me too - which is totally fine by me.
-
As @Ocka pointed out, it is a good idea to run a checksum on the downloaded image file used by your Live USB to install the operating system. Seems you already did that, so I won't beat a dead horse. Still though, it wouldn't hurt to try downloading the image again and burn that new image to a different USB stick.
-
One possible solution is to manually partition the disk before running the installer. You can use a partitioning tool like GParted to create any desired partitions on the disk, and then select the appropriate partitions during the Ubuntu installation process.
-
Bad sectors on the hard drive can cause data corruption or loss, and could result in system crashes or other errors. If bad sectors are detected during the installation process, the installation may fail or the system may not be able to boot properly. Similarly, if errors are found by e2fsck during the installation process, it may indicate that there are issues with the file system which is meant to be installed.
-
There are a couple of tools you can use to run checks on your disk for errors:
Before that though, you need to unmount the partition you just mounted at @Ocka's suggestion:
- While in Live USB mode and before trying to start the install process again, can you reverse what you did when you mounted the partition?
- You can click the same button (square, not hyphen/minus sign).
- Run
df -h /dev/sda5to determine the mount point where/dev/sda5is mounted. It will probably return something like:
Filesystem      Size  Used Avail Use% Mounted on
/dev/sda5       9.8G  4.2G  5.1G  45% /mnt
-
- You can also run
mount | grep /dev/sda5to determine the mount point of/dev/sda5which will probably show you something like:/dev/sda5 on /mnt type ext4 (rw,relatime,data=ordered)
- You can also run
Note: The /mnt directory is often used as the default mount point for partitions when running an installation via Live USB. This is because the installation process needs a temporary location to mount and manipulate the target partitions before they are installed onto the permanent storage device. That said, your mount point might be different; that's why we ran those commands above to identify it.
Once you've determined where that /dev/sda5 partition's mount point is, unmount it with something like:
sudo umount /mnt in terminal to fully unmount that filesystem you highlighted.
Now you can proceed with your disk checks.
Note: these commands below can potentially cause data loss if used improperly. It's a good idea to back up your important data before running these commands.
- What happens when you run
e2fsckorbadblocks? Does the output show errors that can be fixed, or bad sectors on the disk?
Examples:
sudo e2fsck /dev/sda5-
/dev/sda5: clean, 295/128016 files, 36415/512000 blocks- shows no error and that
/dev/sda5is clean.
- shows no error and that
-
sudo badblocks -v /dev/sda5-
Pass completed, 2 bad blocks found. (2/0/0 errors)
- indicates that 2 bad blocks were found during the scan, and that there were no read or write errors during the scan
-
Note: You might need to wait some time for both commands to finish due to the size of your disk
- Other thoughts that might be too much for a possibly simple problem:
I see your disk/partition is MBR and I wonder if the MBR partitioning scheme type is the cause? If using an SSD with UEFI to run Zorin, you might consider changing to a GUID/GPT partitioning table/scheme.
- If you want to try converting to GPT and see if that resolves the issue and you don't have much to lose, you can try that by installing
gdisk:sudo apt-get update
sudo apt-get install gdisk- Use
fdiskand runsudo fdisk -l /dev/sdato make sure you've identified the right disk which contains the partition you want to convert. The commandsudo fdisk -l /dev/sdawill print the partition information of the disk/dev/sda; so in your case, it looks like you want to look for or target/dev/sda5for conversion to GPT partitoning scheme. Opengdiskby running the command:sudo gdisk /dev/sda. And proceed slowly from here.
- Use
-
- While in gdisk, type
pand hitEnterto print the partition table. You should take note of theStartandEndsector values that are shown for/dev/sda5. So for instance, you might see something like:
- While in gdisk, type
Disk /dev/sda: 465.8 GiB, 500107862016 bytes, 976773168 sectors
Units: sectors of 1 * ### = ### bytes
Sector size (logical/physical): ### bytes / ### bytes
...
Device      Boot    Start        End               Sectors     Size     Id    Type
/dev/sda1     *    2048         1050623           1048576      537M     1    EFI System
/dev/sda2         19533822      1048575999        1029032178   247.7G   5    Extended partition
/dev/sda5         19533824      999999999         980466176    247.2G   83   Linux
Command (? for help): r
Recovery/transformation command (? for help):
Still in gdisk:
-
- Type
rand press Enter to enter the recovery and transformation menu.
- Type
-
- Type
gand press Enter to convert the MBR partition table to GPT.
- Type
-
- Type
pand press Enter to verify the partition table looks correct.
- Type
-
- Type
hand press Enter to display the help menu.
- Type
-
- Type
mand press Enter to return to the main menu.
- Type
-
- Type
nand press Enter to create a new partition.
- Type
-
- Enter the partition number ("5" in this case), starting sector (using the example above, this should be the same as the
/dev/sda5starting sector value), and ending sector (should be the same as/dev/sda5ending sector value).
- Enter the partition number ("5" in this case), starting sector (using the example above, this should be the same as the
So... here's another example using the partition and sector values in first example:
Command (? for help): n
Partition number (5-128, default 5): 5
First sector (34-999999999, default = 19533824) : 19533824
Last sector, +/-sectors or +/-size{K,M,G,T,P} (19533824-999999999, default = 999999999) : 999999999

Created a new partition 5 of type 'Linux filesystem' and of size 247.7 GiB.
-
- Set the partition type to whatever it was before the conversion (likely
83for Linux) - and you can see this in the firstgdiskexample.
- Set the partition type to whatever it was before the conversion (likely
-
- Type
pand press Enter to verify the partition looks correct.
- Type
-
- Type
wand press Enter to write the changes to disk.
Afterward, you might see something like the below:
- Type
Command (? for help): p
Disk /dev/sda: 465.8 GiB, 500107862016 bytes, 976773168 sectors
Disk model: ST3250318AS-CC38
Units: sectors of 1 * ### = ### bytes
Sector size (logical/physical): ### bytes / #### bytes
I/O size (minimum/optimal): #### bytes / #### bytes
Disklabel type: gpt
Disk identifier: 93082234-A291-458D-B8C9-7BD1AAD375F4

Device         Start       End   Sectors   Size Type
/dev/sda1       2048  1050623   1048576   537M EFI System
/dev/sda2    1050624  2050047    999424   247.7M Extended partition
/dev/sda5   19533824 999999999 980466176 247.2G Linux filesystem

Command (? for help): w
The partition table has been altered.
Calling ioctl() to re-read partition table.
Syncing disks.
-
- Reboot the system and verify that the partition
/dev/sda5is now using GPT by looking in Disks application, the GParted application or runningsudo parted -l.
- Reboot the system and verify that the partition
Then retry installing Zorin to your machine.
Sorry for the ![]() , hope you get this figured out and let us know if you do, it might help someone searching for the same solution.
, hope you get this figured out and let us know if you do, it might help someone searching for the same solution.
PC is 14 years old and i dont know if i have legacy in bios(as i cant see it)
e2fsck shows no badblocks since i formatted my entire disks with zeroes and then changed the file system of it to ext4.But badblocks never completed the scan , so i had to close the terminal.
I make the installer auto partition itself , now will try manually partitioning
This topic was automatically closed 90 days after the last reply. New replies are no longer allowed.


