Okay, a question on a theoretical situation that I will face sooner or later.
When I first installed Zorin, on a 2tb ssd, I set the boot partition to 10Gb and the root partition to 300Gb and the rest for home.
I can see now that the first two are too large for what they need space-wise and when I checked if Gparted (from live USB) would do resize AND move them, I got the message about "moving a system partition may fail to boot".
I have made an image of the partitions in Macrium in win10,
So question is if I do move the partitions and it doesn't boot, can I just restore the macrium image by booting into win10 and restoring the partition from that side.?
Or is there a way of reinstalling Zorin by booting from the USB installer and resizing the partitions during a new installation (or recovery) and KEEPING all the files eg: not losing programs and settings already installed!?
When You choose during the Installation the ''Something else'' Option and then only delete the Partitons and keep home, You should be able to keep the Stuff in Your home Partition. But Programs not if they are not installed in Your home Directory.
But You should wait for Answers from others who do it that Way. I make this differently.
Make sure you create a bootable Macrium Rescue USB, BEFORE you need to use Macrium to do a image restore. In Macrium find "create bootable rescue media" and do that.
I once have reduced the size of my root partition from 500GB to 60GB and there was no problem during the boot after resizing. But in your case you also have a boot partition to resize so I can't be sure of that. (I'm assuming, you are referring your EFI partition as the boot partition.) You can share screenshot of your current partition layout just to avoid the confusion.
And one good thing that you have already done is having a separate home partition. So just incase if the reinstallation is needed then all your user data and app configuration will be safe, you just need to reinstall the apps (you need to use the something else option and do the manual partitioning without formatting the home). All your app configurations are stored in a hidden directory called .config inside the home directory. You can copy that whole .config directory to an external drive as an extra measure of precaution.
The end goal should be not to mess the UUIDs of partitions which are used by fstab to boot the system. Assuming you have made necessary backups of your important data, now you can proceed with the following steps.
Step 1: Check your current UUIDs
First we are going to save the infos of current values of UUIDs to verify them later in the final step after resizing.
Boot to your current Installed Zorin system
Open the terminal and run the following two commands:
sudo blkid
&
cat /etc/fstab
Copy the the outputs of these commands to a text file and save this text file somewhere else.
Step 2: Resizing the partitions
For this first you need to boot into Zorin's live mode using the bootable pendrive you have.
In the Live mode launch gparted and do the resizing one by one.
First resize your EFI (boot partition) after it is successful then resize your root partition.
At this point your partition layout should be something like this:
EFI (new size)
Free space
Root (new size)
Free space
Home
Now you need to move the Free Spaces to the right adjacent to the Home, and increase the size of home if that was your plan as well. The partition layout will be:
EFI (new size)
Root (new size)
Home (new size)
If you don't see any errors in any of the sub steps during the resize then it's a good sign.
Step 3: Verify the UUIDs of the resized partitions
After completing the Step 2 do not shutdown or reboot the system yet.
Close gparted and Open the terminal & run:
sudo blkid
Now from the output verify if the UUIDs of newly resized partitions are the same with the old ones that you have saved in the text file during Step 1.
If they matches then you are good to go, now you can reboot and try to boot the installed Zorin system. It should boot without any issue.
Hi there, that is very promising news, thank you for the pointers.
cheers CD
updated -
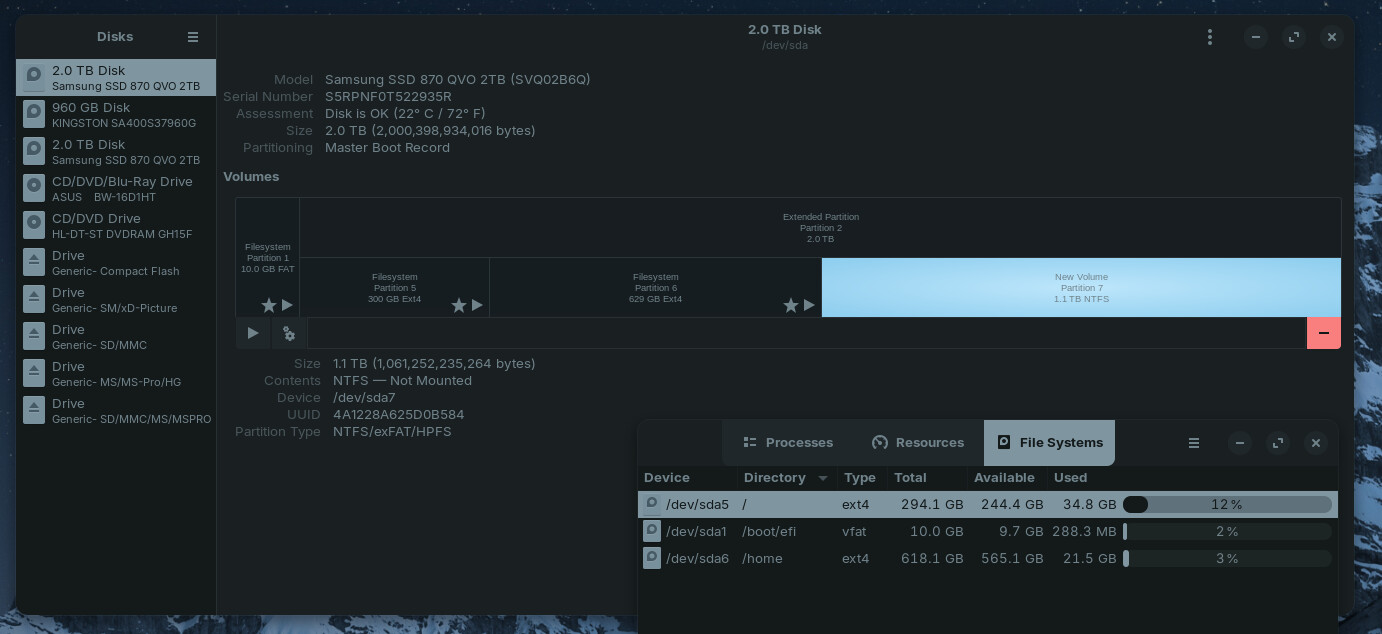
here's the disks display.
I forget that the ext4 partitions don't take up all the space of the disk, there is an ntfs at the end but that is not important enough to keep if it helps with the overall process.
You have set the partition layout with MBR so there is an extended partition as well, which also has a play in the process.
You don't have to click on the unallocated space to Resize/Move it. You need to click on the partition right next to it and then select the Resize/Move option and then use the slider above to drag it to right or left.
First for the free space between boot partition and extended partition. You need to add this free space to the your extended partition. To do so Click on the extended partition -> Resize/Move and then expand it by adding that free space to it.
This will add the free space inside the your extended partition. The job with the extended partition ends here.
Once it's inside, you can repeat the above step with /dev/sda5 or /dev/sda6 to move both the free spaces to a same place near to your home partition and then resize it.
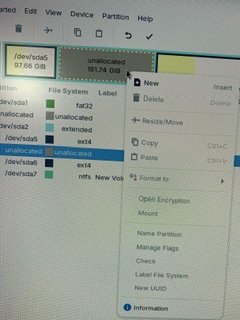
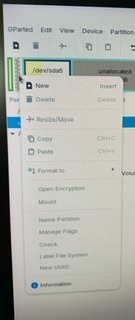
Is setting the disk to MBR do-able inside Gparted. I don’t see the option.? Or is MSDs = mbr
I know that I don’t click on the empty space, but on the existing partition, the photo was to show you that there was no options for the empty space. And the only other option was to move the existing partition into the empty space on the left, which is when I get the warning about booting failure.
If you notice the whole drive sda2 (the one I’m working on) is already an extended partition. Does that affect the steps from now onward?
So, if the mbr option is not in Gparted, is it ok to move the sda6 to consume the empty space on the LEFT and ignore the booting failure warning.?
Thereby accepting the small loss of the empty space between the sda1 and sda5!
Or if the mbr setting is a priority> how to achieve that?
The disk is already MBR, you don't need to change anything for this. Partition tables are generally set during a fresh installation. For modern systems using UEFI environment, GPT partitioning is recommended. But you already have set up MBR partitioning with a successful boot to the system. So this doesn't need be changed now.
Yes, you can ignore that warning and proceed with the process. Do remember what I had said in my first post, for the system to boot The end goal is to not to mess up the UUIDs.
You can add that free space to your /dev/sda6 as well, you need to follow these steps:
And don't forget to apply the changes in gparted. Gparted doesn't make change instantly to the disk, rather it makes a list of tasks according the changes you are making which can be seen at the bottom side of the gparted window. To apply those changes to the disk click the tick mark () that is displayed on the end of the gparted toolbar.
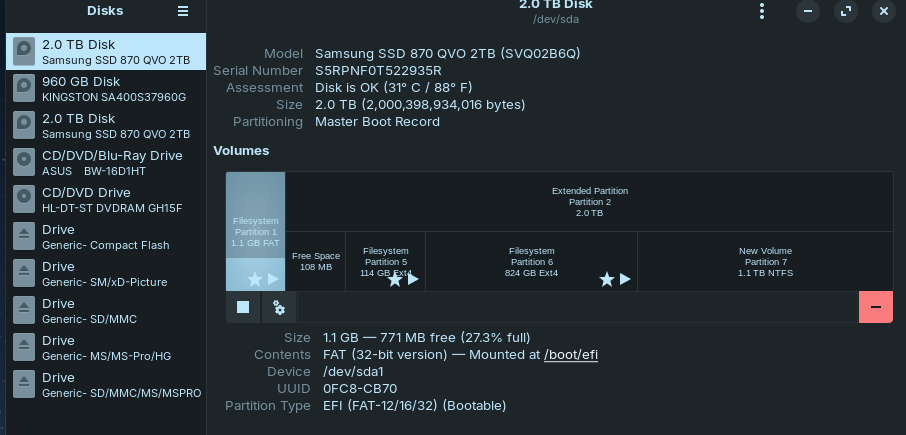
I assume that the tiny 100Mb space between the two different file systems is a kind of buffer.
So the step I didn't get was to first add the empty space to the whole SSD extended partition bit. And the hardest part was to 'ignore' the warning about an 'impending total disaster!! hahaha
cheers to you 'littlekun' wherever you are. And thanks again to you excellent guys'n'girls at Zorin forums.
About that 100MB free space, don't know how it got left there. Was that got created automatically? You can leave it if it's not bothering, a 100MB in 2TB disk is much like a spoon of water infront of the whole Ocean
Or if you have OCDs like me to have everything to be perfect then you can try to add it the home.
It's not about ignoring, when managing the partitions there is always a chance that something could go wrong resulting data loss and broken system. The tool gives you this warning message as a reminder that Making changes to partitions might break the system. And this is where the end user needs to look at the tasks carefully that if everything is according to plan or not. And only after being sure of the things, they can proceed with the warning.
Trust me, even some users who already have experience with Linux and partitioning make mistakes and lose their data. I have seen it few times in real.
For this you first need to understand MBR partitioning first.
In MBR partitioning only 4 primary partitions are allowed. If the disk with MBR partitioning already have 4 primary partitions then the user cannot create any other partion when needed.
To overcome that limitation an extended partition is used. Inside the an extended partition you can make multiple partitions (upto 128 if I'm not wrong). These partitions that are made inside the extended partition are called Logical partition.
So if someone wish to create multiple partitions with MBR partitioning then now they have a choice with the extended partition.
In your case you have one primary partition (your boot partition) and one extended partition (/dev/sda2), inside which all other your root, home and ntfs partition (these are your logical partitions). A boot partition always need to be a primary partition otherwise system won't boot.
You can assign the sizes of Logical Partitions(LP) according to how much space you have in the Extended Partition(EP). And you can't add the free space, gained by Shrinking the Primary Partition(PP), to a LP directly as it's outside of the EP.
For e.g: suppose your EP is 500GB and inside that you have 2 LP, one is 150GB and other is 350GB. Now if you wish to increase the size of 150GB ones to 250GB and this would make the total size 600GB (250GB+350GB). But you can't increase it because the current size of EP is only 500GB. So in this case first you extend your EP by adding the 100GB of free space to it, that will make the EP a total of 600GB (500GB+100GB). And this free space will now be inside your EP. And then only you can resize the 150GB partition by adding that free space to it.
This is what happened in your case.
However under GPT partitioning scheme this is not an issue because you can make more than 4 primary partitions in GPT.
I hope my explanation is not so confusing and able to clear your doubts