Using the Terminal Emulator in Linux Distros

As people switch from Windows to Linux, one of the common comments is about the use of the Terminal Emulator in Linux.
I remember quite well that during my transition to Linux, I often asked if there was a "GUI" method available. The CLI was so unfamiliar, daunting and so... blank. A 'simple' text based interface seemed to lack buttons, drop down menus and options. With the terminal, I had no idea where to begin, what command to enter and it did not seem to guide me any, as a GUI with buttons and menus does.

Zorin OS is based on helping users to make the switch. In this, it seems very important to teach users how to learn the system rather than to try to Emulate Windows.
This is fundamental, as most users are attempting to find an alternative to Windows for a reason and wish to escape the 'Windowisms" that seizes control over their system.

The terminal is your portal to taking back control.

Appearance

One thing a user can do is add spellcheck and word suggestions to the terminal to help alleviate any fear of typos and add some warmth. You can also add some custom appearance to the terminal, giving it a friendlier look:
https://zoringroup.com/forum/12/15956/
I prefer to use the xfce4-terminal over gnome-terminal for this reason: It allows the Menubar and Toolbar to be active on the Terminal Window, adding quick access to your tools and options along with adding familiarity.

Speed

Work productivity is important. The terminal offers speed like no other, allowing the user to execute an action and move on to the next. With a GUI application, you are searching for the button, exploring the options and reading drop down menus. GUI apps are often very limited in what they can do whereas the terminal is a powerhouse of ability.
With two simple commands, I can fully update my system and clean all residual files.

sudo apt update && full-upgrade

sudo apt clean && autoremove

Try doing that with a GUI with that kind of simplicity and speed.

Commands

When you install a package using a GUI installer, the installer runs the same APT commands that you would in terminal, only with more limitations. So using an installer will not add any benefit to avoiding Dependency Issues.
What installers or Package Managers (Like Synaptic) can do is organize your options and present them all in a neat layout that can be followed.
The vast majority of the time, when using the terminal, you are issuing commands in the terminal while following a guide that outlines what these commands are. You do not need to have them all memorized; Indeed, Linus Torvalds does not have all the commands memorized. What matters is not rote memorization, but in using the direct control over the system to fully ensure a safe and well operating machine.

The terminal is the best friend you ever had on a computer; allowing direct access to all parts and advanced troubleshooting and diagnostics. The terminal provides the type of interface that MS Windows sought long and hard to deny us, making the users rely on shoddy tech support and incessant internet searches to no avail.
I would hope that this thread will become a user contributed resource that lists Common Commands and Terminal tricks. But in the meantime, for all users; Please use the resource that the entirety of the forum offers to ask when in doubt.

7 Likes

I find it useful to write down commands or series of commands in a simple notebook to refer to when needed for specific tasks. That is especially helpful for occasional housekeeping tasks and running CLI utilities e.g. Rkhunter etc. Maybe this thread can also become a "notebook" of useful commands.

The CLI is powerful, but should not be frightning to the user. I would reitterate what others have mentioned on the forum elsewhere. Read the screen output carefully before clicking "Y".
It is like reading the small print of T&C's. Just take time to make sure you understand what you are committing to doing and you will be alright.

As I have limited disk space. In addition to cleaning apt, I use the following commands (from my notebook) to
recover space taken by journal files:

check disk usage:

journalctl --disk -usage

review:

journalctl -r

start new, archive old:

sudo journalctl --rotate

limit size to 100M and clean:

sudo journalctl --vacuum-size=100M

I hope I have written that correctly, or @Aravisian will correct me.

6 Likes

9 posts were split to a new topic: Using the terminal emulator in Linux distos comments and issues

Split to keep the informational nature of the topic clean. Please post more commands but reserve comments and issues for the sister thread.

Yes, there is an autocomplete addon for zsh which is mentioned in the thread for "Zorin spiffy terminal" linked above.
Or:

Opinions vary, as noted above, as to the effectiveness. :stuck_out_tongue:

1 Like

I never used it, I only have heard of it. I just now installed the autocomplete for zsh and... you gotta try this. Wow.

This may just qualify.

EDIT: A picture speaks louder:

2 Likes

Looking at a standard terminal:
std-term

There is not a lot there. No hints, really. It looks like it is asking for something, but what does it want?
That green text. It reminds me of a computer screen from the 1980's.
Flat. Drab. The major attention is on the text and only the text. Well... the text is the most important thing... Even so, it looks intimidating.
I think that in this case, especially for users migrating to Linux, appearance is very important.

Looking at my terminal window:

There is still the text based interface, but this appearance is more familiar. It looks more like the GUI apps that many users are more accustomed to. The system theme can vary, but the first impression between the two leaves the second one looking a little more friendly.
(For the curious, that blue I-beam is the mouse cursor.)
I use xfce terminal as it has far more options than the default Gnome.

sudo apt install xfce4-terminal

Then set as default. The xfce4-terminal can be used on any desktop environment.
You do not need to install xfce to get it.
Under Edit > Preferences > Appearance, you can set the colors, change the text colors and set any background you want. In my case, I made one that matches my system theme. I prefer toolbar enabled.
Much of the appearance you see is due to the use of powerlevel10k.

This works with zsh and with oh-my-zsh. With zsh, you can have:

  • Spellcheck
  • Word suggestions
  • Autocorrect
  • and other various features that can make the terminal more intuitive and helpful.

To install:

sudo apt install zsh

Follow the prompt to make zsh your default shell.
To install Oh-My-zsh

sh -c "$(curl -fsSL https://raw.github.com/ohmyzsh/ohmyzsh/master/tools/install.sh)"

Now, you may want the add ons. For the word suggestions (Which I only recently installed myself and am finding to be the Most Useful - it has taught me several commands I did not know):

git clone GitHub - zsh-users/zsh-autosuggestions: Fish-like autosuggestions for zsh ${ZSH_CUSTOM:-~/.oh-my-zsh/custom}/plugins/zsh-autosuggestions

Then add the plugin to ~/.zshrc by pasting this line at the bottom of the file:
plugins=(zsh-autosuggestions)
For Syntax Highlighting, which helps tell you if there is a typo and differentiates portions of the command by color:

git clone GitHub - zsh-users/zsh-syntax-highlighting: Fish shell like syntax highlighting for Zsh.
echo "source ${(q-)PWD}/zsh-syntax-highlighting/zsh-syntax-highlighting.zsh" >> ${ZDOTDIR:-$HOME}/.zshrc

For Autocomplete, which helps prompt the command you are looking for and is very helpful to familiarizing yourself with the terminal:

git clone --depth 1 -- GitHub - marlonrichert/zsh-autocomplete: 🤖 Real-time type-ahead completion for Zsh. Asynchronous find-as-you-type autocompletion.

Then add the plugin to ~/.zshrc by pasting this line at the bottom of the file:
plugins=(zsh-autocomplete)

With all that set up, you can install powerlevel10k

git clone --depth=1 GitHub - romkatv/powerlevel10k: A Zsh theme ${ZSH_CUSTOM:-$HOME/.oh-my-zsh/custom}/themes/powerlevel10k

Then set the plugin to ~/.zshrc by pasting this line at the top of the file:
ZSH_THEME="powerlevel10k/powerlevel10k"
Powerlevel10k requires a compatible font. kcaps made one that uses the Zorin Logo here:
https://gitlab.com/k-caps/Hackfont-serve

He uses hacknerd. I prefer MesloGS, so I made my own with Zorin Logo using FontForge.
https://github.com/romkatv/powerlevel10k-media/raw/master/MesloLGS%20NF%20Bold.ttf

Open a new zsh terminal and enter in p10k configure to set up your Powerlevel10k theme however you want it to be and to test that the font is working correctly.
Enjoy and please ask if any of the above gives you any trouble.

2 Likes

This is a fast reminder to all (That I have been trying to remember to get around to doing) about how to effectively make the Terminal very user friendly.
I use zsh with oh-my-zsh as recommended by kcaps.
@pazoff wrote up an excellent guide using the very similar fish shell.

The add ons are the same.

What these add ons mean for users:

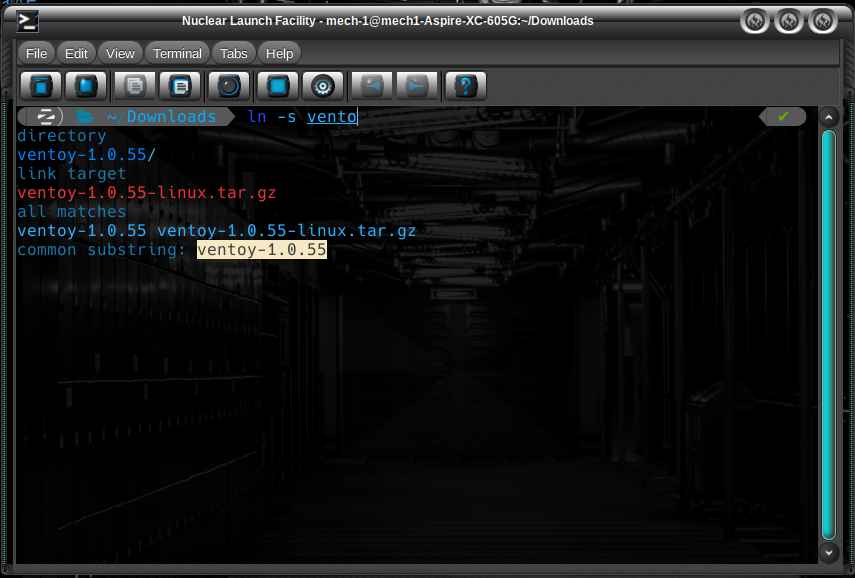
@StarTreker had once commented that part of the trouble with terminal is spelling something right.
Or knowing the Proper Package Name to put in.
Here are some screenshots of the solution to that:

In this first one, I only started typing sudo apt install lib... and you can see in the area below it that I am being Suggested Packages that start with Lib. I need to only arrow key down to the one I want and select it and it appears on my command line for me.

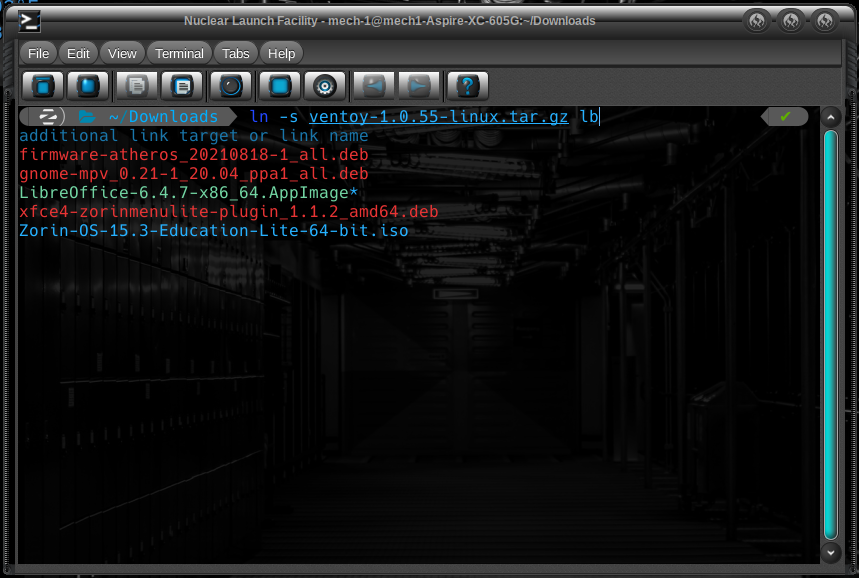
This next one- the linux kernel - same thing. I can arrow key to the kernel I need.

Finally, one more example.
Let's say I am running a command within a directory and I would like to use the files. Perhaps they have a long and complicated name. You might tediously right click the file, choose rename... Then paste it into terminal OR...

Arrow key to it and select it, then start typing the new file name... This time, I will demonstrate mistyping that new name... and yet here we still see it suggested (LibreOffice)

Hopefully many of you will find this helpful to fully utilize the power and versatility of your terminal; Without Fear.

4 Likes

Crosslink:

1 Like