Setting up a Wi-Fi hotspot can be tricky when running a firewall. This post covers two issues that you may run into and how to solve them, using both the graphical interface and terminal commands.
Can't connect other devices to the wireless hotspot
Device connects to the hotspot but there is no internet access
Appendix A
Appendix B
Issue #1: Can't connect other devices to the wireless hotspot.
If you cannot connect to the hotspot at all, it probably means that the firewall is blocking connections to it. There are a few rules that you need to add to instruct the firewall to let traffic through:
-
Launch "Firewall Configuration" and make sure it's enabled.
-
Head over to the "Rules" tab, and click on the + icon at the bottom to add a new rule. We want to follow the principle of least privilege, which means we only allow what's necessary. For that, head over the the "Advanced" section.
-
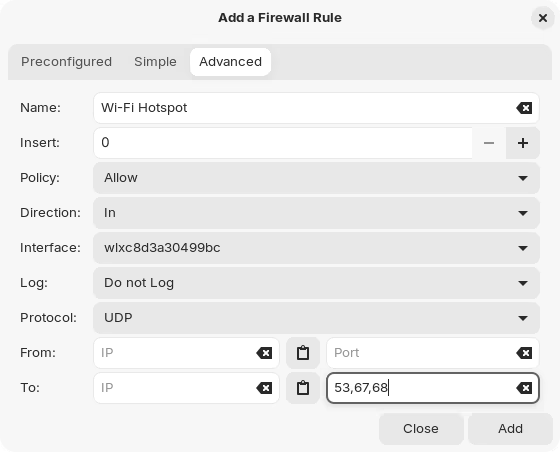
Fill in the details as follows:
-
Name: An arbitrary name for the rule, so that you can later know what it does or why it was added.
-
Insert: The order in which this rule will be processed. For our purposes, it's fine to leave it as 0.
-
Policy: Allow, since we want to create an exception rule to the default firewall policy, which is to block incoming traffic.
-
Direction: In, short for incoming.
-
Interface: The name of the wireless interface you want to allow traffic into. This is the network card that is acting as the hotspot. See Appendix A
-
Log: That's up to you. If you want to record meaningful events like when the firewall is blocking something, you can choose another value. Keep in mind though, that log activity can grow rather quickly in size and take up valuable space in your drive. I will choose not to log anything for this rule.
-
Protocol: UDP.
-
From/To: By leaving the fields blank, we are allowing all sources and destinations. In this case, we only really care about the specific ports that match the network manager stack: 53, 67 & 68.
-
-
Add a new rule, repeating the same process, but this time select "TCP" for the protocol. Under the ports, we only need to allow 53 (yes, again).
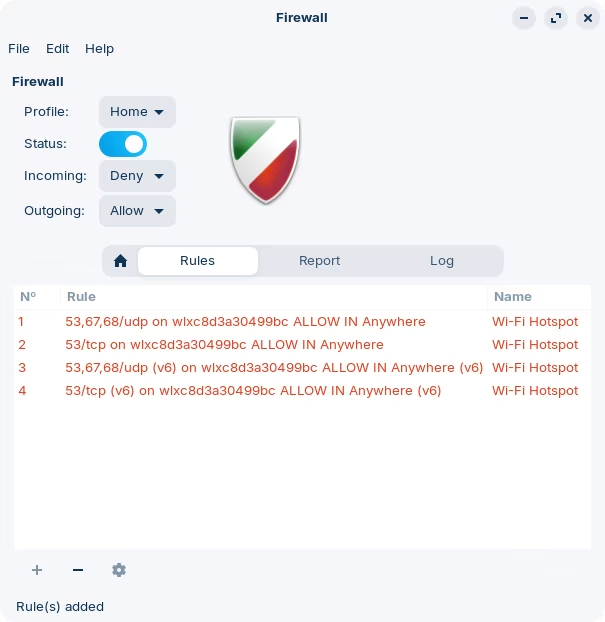
You should have now something like this:
That should allow other devices to connect to the hotspot and gain internet access.
As promised, the equivalent commands to run on the terminal:
sudo ufw allow in on wlxc8d3a30499bc to any proto udp port 53,67,68
sudo ufw allow in on wlxc8d3a30499bc to any proto tcp port 53
Issue #2: Device connects to the hotspot but there is no internet access.
Establishing a connection to a Wi-Fi network does not necessarily mean internet access. This may be for various reasons, sometimes completely outside of your control.
Assuming that the issue is with the firewall, which may be blocking connections between your wireless network interface and your ethernet one (or any other interface that is connected out into the internet), we can add another rule to address this. However, we need a setting that the graphical interface doesn't have by default. We need to enable it by manually editing a configuration file. See Appendix B
When creating a new rule under the "Advanced" tab, notice that the Interface field now has the option to forward packets from one interface to another. In the screenshot below, I'm forwarding my wireless hotspot to my ethernet, which is what grants me access to the internet.
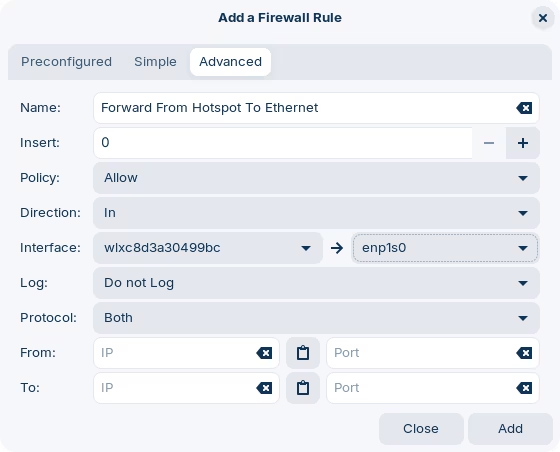
Depending on what your needs are, you can specify some destination ports or addresses, protocols, etc. For general use case, use Both protocols and leave all other fields blank.
The equivalent command to run on the terminal:
sudo ufw route allow in on wlxc8d3a30499bc out on enp1s0 from any to any
Appendix A:
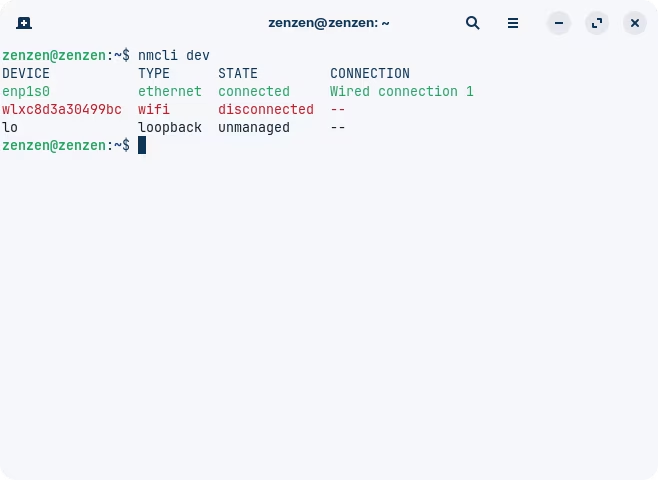
To find out the name of the network interfaces recognized by your computer, you can run the command nmcli dev in a terminal window. This would show all the available interfaces:
Appendix B:
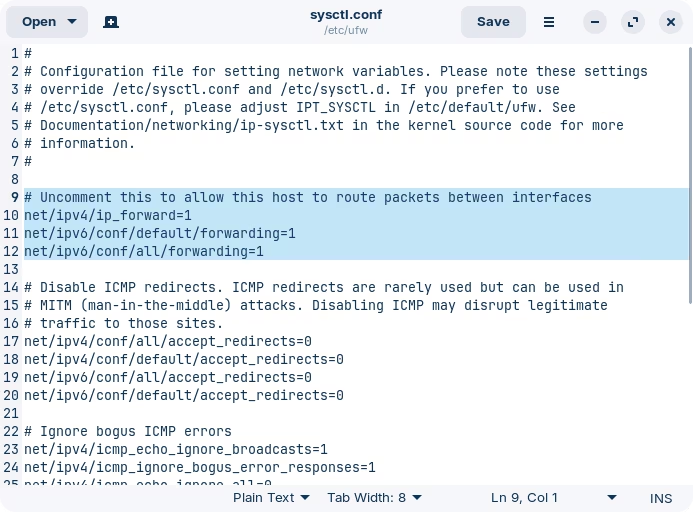
Open the file located at /etc/ufw/sysctl.conf. Remove the leading # sign from the lines 10 to 12. Save the file and re-launch Firewall Configuration for changes to take effect:
Note that you need root/admin privileges to edit it this file:
