The Network File System (NFS) is a file sharing protocol that allows computers to share files over a network. NFS supports various file system attributes used by the Linux kernel, such as user ownership and permissions, which are preserved during the transfer. This makes it an attractive choice for sharing files across computers running some flavor of Linux.
Before we begin...
This is a step-by-step introduction to setting up a simple NFS server with Zorin OS 17.3 Core. The use of the terminal is pretty much required since not all the steps can be done through the graphical interface, at least not easily or without installing additional packages.
You can launch "Terminal" from the applications' menu, or by pressing Ctrl+Alt+T.
This post assumes a setup of 4 computers running Zorin OS 17.3, all connected to the same local network. One of the machines will be the server, while the others will act as clients.
You can follow along using virtual machines created with VirtualBox or Virt Manager. This will make it easier to learn and restore them if anything goes wrong.
Lastly, see Appendix C for some term definitions used throughout this post.
Configuring the server
Installing NFS
Install the NFS server package, and enable the service so that it starts automatically on boot.
sudo apt install nfs-kernel-server
sudo systemctl enable --now nfs-server.service
Configure the share directories
We have to decide which directories we want to share — export, in NFS lingo — by editing a configuration file located at /etc/exports. First, let's make a backup copy just in case:
sudo cp /etc/exports /etc/exports.bak
Write each directory you want to share on a separate line. Each line is made up of three components:
-
The full or absolute path to the directory that you want to share. Keep in mind that every sub-directories will automatically be shared as well.
-
The specific machine(s) that you want to share it with, expressed as a range of IP addresses, if you wish to share with multiple machines on the same network, or an individual IP address if you want to be more selective.
It's also possible to use a domain name, including wildcards if you have a more organized structure. -
Options specific to that network share. We'll see them later in more detail.
For example:
/home/zenzen/Documents  192.168.122.20(rw) \
                        192.168.122.21(rw) \
                        192.168.122.22(rw)
/home/zenzen/Pictures   192.168.122.0/24(rw)
The NFS server is exporting two directories. The first line is sharing the /home/zenzen/Documents directory with three machines. The backslash indicates that the entry continues in the next line, instead of writing all in one very long one. This makes things more readable.
On the second line, or second entry I should say, the /home/zenzen/Pictures directory is being shared with all machines within the IP range: 192.168.122.xxx. This includes the three computers from the previous entry.
Reload the configuration to apply the changes by running the command:
sudo exportfs -a
Changing the flag for -v will show a listing of all the directories exported, and their respective configuration (including the options applied implicitly by default):
sudo exportfs -v
Securing the network access
Out of the box, NFS doesn't provide any authentication mechanisms, and it relies on the standard Linux file system permissions for security. What this means is that any computer capable of reaching your server over the network could potentially gain access to the shared folders, which is why is important to be as specific as possible in the configuration file as per the previous step.
However, we can take things a bit further by creating firewall rules to refine exactly which hosts can reach this server over the network. This is optional, but having a firewall is always a good idea anyway.
Firewall configuration
Having a firewall enabled on a server is always a good idea, although it can sometimes be tricky to configure properly. The goal is to restrict network traffic to the NFS server by creating rules that specify which hosts are allowed to connect to it. This actually sounds very similar to the previous step, where we had to specify the same information for each of exported directories. However, with a firewall we can also specify the ports that are required to provide this service, while shielding the server from other connection attempts.
Since we want to allow only the individual ports that are actually needed, and nothing more, we need to edit the NFS service configuration to tell it to use a specific port. Otherwise, it would pick one at random when it first runs, and that can be tricky to set up properly.
So, let's edit the file at /etc/nfs.conf. As usual, create a backup before editing system configuration files:
sudo cp /etc/nfs.conf /etc/nfs.conf.bak
We only need to make one tiny change. Look for the stanza labeled as mountd and update the port property:
[mountd]
port=20048
Leave everything else as is, we only need to change this line. Make sure to remove any preceding #, and don't leave any spaces. The choice of port 20048 is because that is the standard used for the NFS mount protocol.
Restart the NFS service to make this changes take effect:
sudo systemctl restart nfs-server.service
And now, let's configure the firewall.
Zorin OS comes with the Uncomplicated Firewall (UFW) installed, although it's disabled by default. We need to enable it and create a rule to allow traffic as described earlier. This we can do using a graphical interface:
-
Launch "Firewall Configuration" from the applications menu.
-
Enable the firewall and move on to the Rules tab. Click on the + button.
-
In the "Advanced" tab, fill in the details as follows:
-
Name: An arbitrary name for the rule, so that you can later know what it does or why it was added e.g.: NFS.
-
Insert: The order in which this rule will be processed. For our purposes, it's fine to leave it as 0.
-
Policy: Allow, since we want to create an exception rule to the default firewall policy, which is to block incoming traffic.
-
Direction: In, short for incoming.
-
Interface: If you have multiple network interfaces i.e. a wireless and Ethernet, you can specify one of them here. When in doubt, choose "All Interfaces".
-
Log: This might be useful to diagnose any problems or if you suspect something is not quite right. Log files can take a surprising large amount of disk space, so I'd suggest keeping it off until you have a reason to enable it.
-
Protocol: TCP.
-
From: The IP address or range of addresses that you want to allow. In this example I'll allow all addresses in the local network, so 192.168.122.0/24.
-
To: The IP address of this computer, the NFS server (click on the clipboard icon to fill it automatically).
-
Port: Only the destination port needs to be specified, as shown in the screenshot below. The ports that we want to allow are 111, 2049 and 20048.
-
-
Click "Add" to save the changes.

And that's it, changes take place immediately and automatically. For completeness, this is how the same can be done through the command line:
sudo ufw allow in proto tcp from 192.168.122.0/24 to 192.168.122.223 port 111,2049,20048
Configuring the client:
From the client, we can use the file manager, Nautilus, to automatically mount the exports from the server. However, by default, the NFS server expects incoming connections from ports under 1024 which are reserved and cannot be used by programs like Nautilus. We can change that by running:
sudo setcap 'cap_net_bind_service=+ep' /usr/libexec/gvfsd-nfs
Now, we can launch the Nautilus and go to "Other Locations". At the bottom of the window, enter the following in the "Connect to Server" input field: nfs://192.168.122.223:/home/zenzen/Documents.

Substitute the IP address with the one from your own server, and the path as specified in the /etc/exports file. You should now have that folder visible:
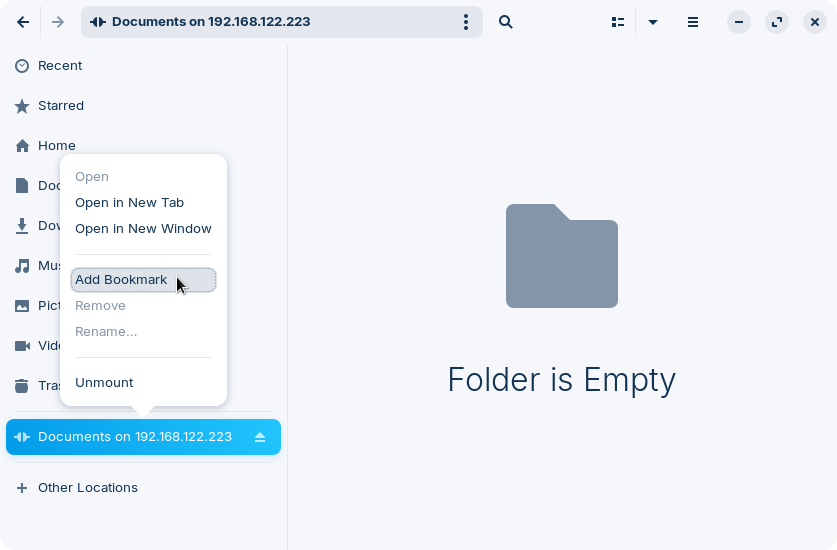
You can create a bookmark for that location, so that you can access it whenever you want without repeating this process.
Appendix A
Appendix B
To find out what the IP address is for a particular host, go to Settings > Network. Click on the little cog icon next to the connection type that you want to check to open up the details prompt:
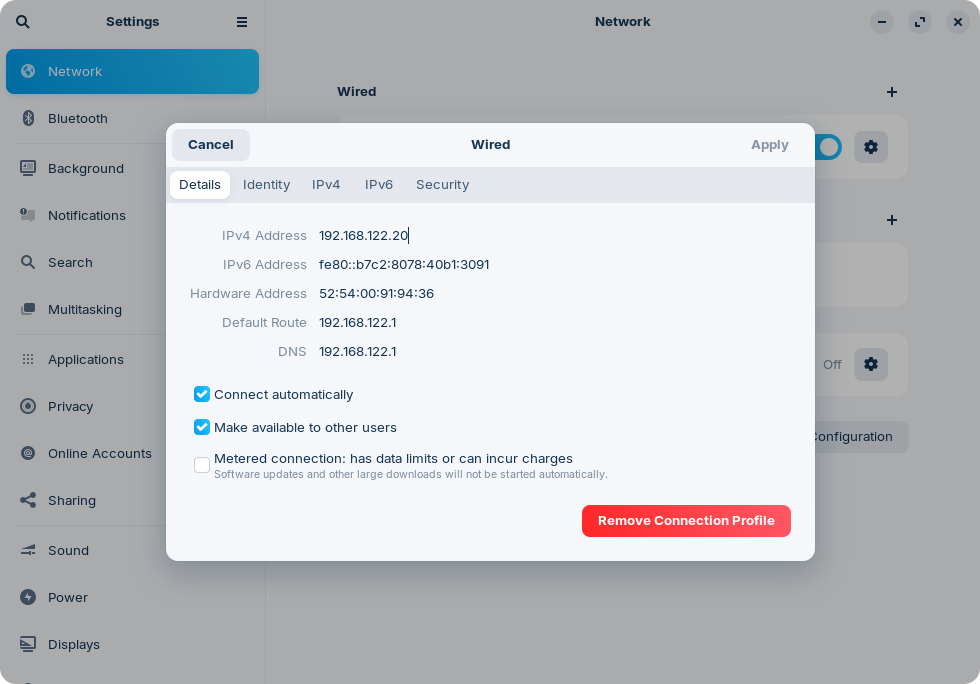
If you are interested in knowing what is the subnetwork range — to specify the range like 192.168.122.0/24 — you can do so with a command on the terminal:
ip route
The line reporting the "src" will contain both the actual address and subnet for that interface:

Appendix C
Let's make it clear what some of the words thrown around this post actually mean. Keep in mind that these definitions are provided in the context of this post only.
-
Host: a host is a computer. You might have seen messages like "cannot establish connection to remote host".
-
Server: a server is also a computer, we just call it like that when its primary purpose is serving some content.
-
Client: a client is the counterpart of a server, meaning it's the computer that initiates the connection with a server to request something from it.
-
Service: the actual computer program running inside a server.
-
Share: exported directory specified in the NFS service configuration.
With these definitions in mind, when I say things like "restart the NFS service" what I mean is restarting the software and not the whole machine.