Several people have commented, questioned and stated that they don't understand partitioning, it's purpose or how to modify them safely. I'm hoping this provides clarity and understanding so that everyone is able to confidently, or at least competently, modify the partitions on their system with little to no adverse effects.
What is a partition?
To answer this, it is better to consider something that everyone understands, and a little less technical. Think of a disk drive akin to a file cabinet. Specifically, a file cabinet without any drawers. Sure, you may be able to find a way to put something in it, but it would not be all that organized. It would be difficult to find anything and it would be a mess.
Partitions are the drawers of the file cabinet. You can create a large one that takes up the entire drive, or break them down to file sizes if you like. These drawers are listed in a table in the beginning of the drive. This table records where on the drive that the partition exists. It's like having a sheet of paper at the top of the file cabinet that says that the first drawer is two inches from the top and is ten inches tall. So it contains the beginning "address" of the partition and the ending "address".
Drive manufacturers are required, because of the standards created, to break the drive down to cylinders, heads and sectors for platter drives or hard disk drives (HDD) and blocks for static state drives (SSD) and NonVolitile Memory Express (NVMe) drives. This is how the partitions are addressed. These addresses can be changed, as long as the drive isn't in use (mounted).
MBR partitioning doesn't allow the start address to be modified. You would have to delete the partition to change the start address.
Let's take a look at an example.
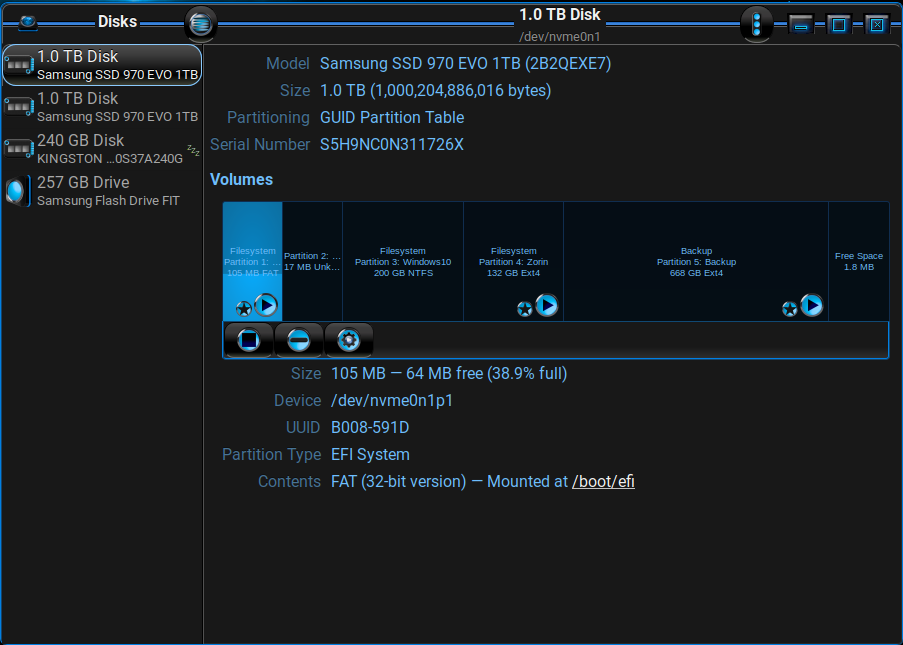
This is my system NVMe drive (its similar to an SSD drive) in the Disks app. As you can see, there are quite a few partitions. Each of these "drawers" are specific to one purpose.
The highlighted partition is the EFI partition. It contains the grub boot loader (it used to contain the Windows Boot Manager, but I overwrote it installing grub, on purpose). The star on it indicates that it has the boot flag (this is represented differently in each partition application). The "play" button means it is mounted (hence the square button below it to unmount it). In GPT partitioning, the boot loader can be anywhere on the drive.
My drive is set up in the traditional MBR partitioning format, where the boot loader is the first partition. This is important to remember because MBR partitioning won't boot a drive if the boot loader isn't the first partition.
The information at the top is mostly unimportant. The most informative part of the top portion, other than the size of the drive, is the partitioning scheme. It clearly tells you whether the drive is partitioned using GPT or MBR. Knowing that informs you of your limitations in making changes.
The information at the bottom is useful, giving us the size of the partition, the UUID (important if you want to modify /etc/fstab so the drive will be mounted at boot) and the contents which list the file system (FS) and if it's mounted and where.
Clicking on a partition in the visual part will select it to show that partition's information. This will also allow you to click the minus sign, as long as it isn't mounted, delete it, or click the cog and provide you options to modify it.
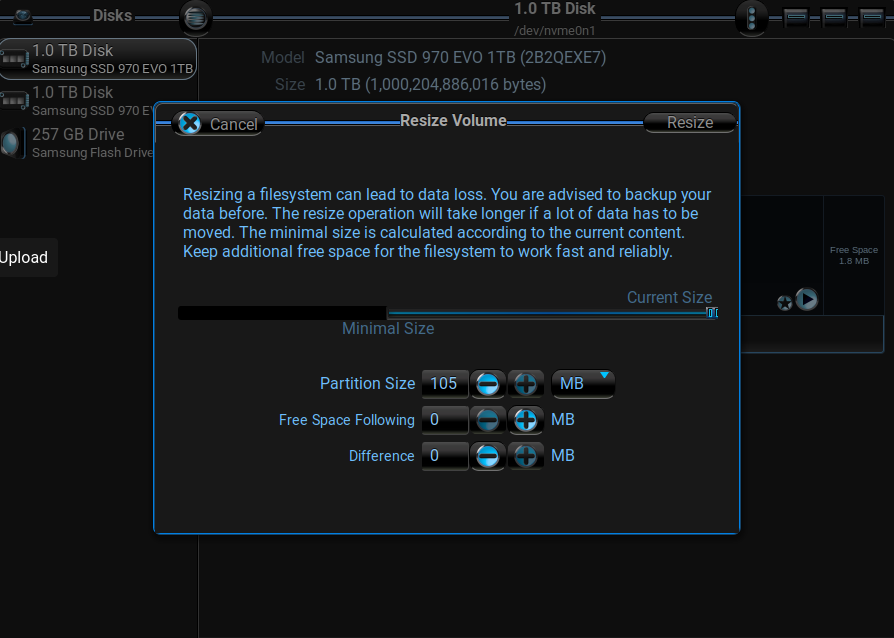
Disks limits you a little, since it doesn't give you the option to modify the start (space preceding). If you only want to make the partition larger or smaller, this application will work fine for you. That is one of the biggest differences between disks and another application, Gparted (which is meant specifically for dealing with partitions). Anything you do in Disks will occur immediately.
Gparted is a bit more forgiving. It lists the information pretty much the same way:
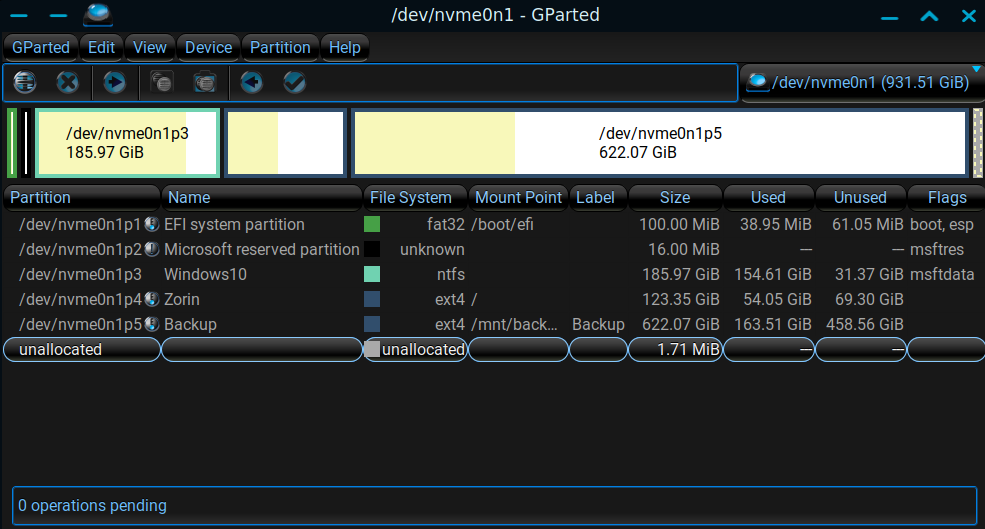
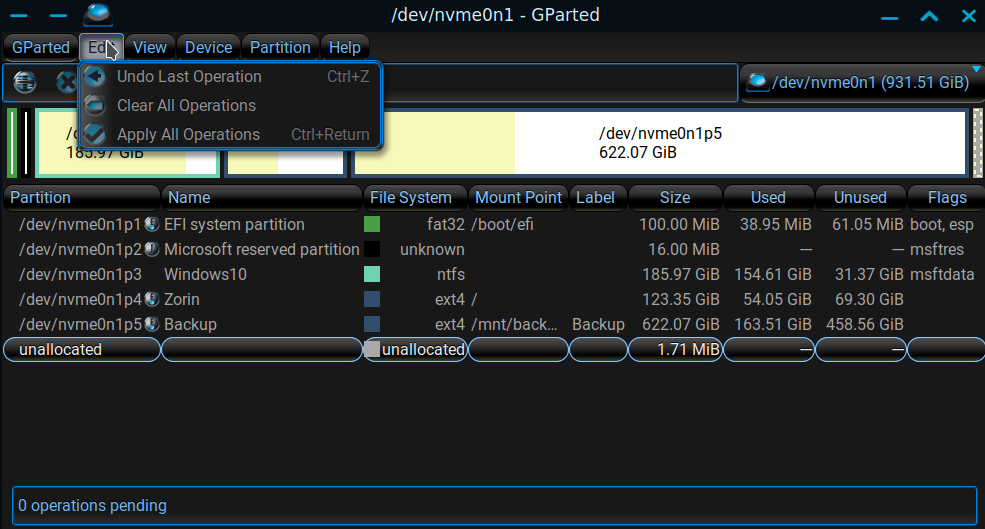
One of the main reasons to use Gparted instead of Disks is that any operation that you perform in Gparted is reversible, until you choose the Edit menu and Apply all Operations. That is when the operations you have configured, resizing, moving and deleting, will be applied.
This allows you to make changes, modify them again, and again, until you have it the way you want.
I covered these applications so you will know which one to use for what you want to accomplish.
Creating, modifying and moving partitions
All partition operations can only be done on UNMOUNTED partitions. You will have to use a live image or some other external means to modify system partitions. You can not modify a partition you are currently using.
Create
Drives normally come with a partition encompassing the entire size (when bought by itself). The first thing you should do is delete this partition and set it up the way that will work best for you. This allows you to create a partition, choose the size, choose the file system (FAT32, exFAT, NTFS, NFS, ext4, ext3, ext2...) and how many partitions.
MB vs GB
Most partitioning software, when creating or modifying a partition, the sizes are shown in MegaBytes (MB). It is important to understand, because most people know of and think in GigaBytes (GB). You will have to multiply the MB, with the GB you intend to have, by 1024 in order to get the correct size in MegaBytes. If you want a 60GB partition, you will have to put 61440MB in the size field.
Remember, this is not files, or folders, it is the container that will hold them. Their order will not matter in GPT partitioning. As previously stated, in MBR, the first partition has to be the boot loader.
Provided that there is free (unallocated) space available before or after the partition, you can resize and move them. Like a physical file cabinet, there is no way to change the order of the partitions. A partition before or after that partition has to be removed in order to change their order. Take note of this, because once you have created your partitioning scheme, that is the order it will stay in.
Modifying
Modifying a partitioned drive can be a painstaking process. In order to modify a partition that is surrounded by other partitions, you will have to modify the preceding and following partitions. This means reducing the size of the surrounding partitions so that you have free space to work with. I would begin with the following partition (the one after the partition you want to enlarge), resizing it by reducing what is at the end of the partition. Then resize the preceding partition (the partition before the one you want to enlarge), reducing what is at the end. This results in unallocated space after the preceding partition and after the following partition. How does this help? Well, now there is free space to make moving partitions possible. I would apply those changes. Once complete, the more time consuming and error prone operations can be undertaken.
Moving
Moving a partition is an operation that should be performed by itself. While you could set Gparted to apply all of these operations, in the same order in which you configure them, at one run... if it fails there will be no way to recover from it since other operations will take place, possibly overwriting information you don't want to lose. Any operation requiring the change of the start address, moving a partition or resizing the beginning of the partition, could result in data loss. So we perform them separately in order to have a chance to recover, just in case. Obviously, you should backup anytime prior to performing partition "maintenance".
Selecting move will allow you to graphically slide the selected partition to the right or left, or you could use the "Free Space Preceding" and "Free Space Following" to adjust the placement.

By sliding the following partition to the right, you will adjust the free space to the left of the partition. Apply that operation. When you do, don't use the computer for other operations. This allows the processor to be utilized for the move, keeps RAM available for the move and reduces the chance of data loss.
With these operations complete, you have free space surrounding the partition you originally wanted to resize. You can do one of two things, increase the size and move, then resize again or move and resize once. It should make sense, move the partition, again without any other operation. Once it is complete, resize the partition.
After each of the moves, you could mount the drive so you can access the partition and check it's contents. This is recommended, especially if any errors were presented during the move. This also allows you to recover data or restore from a backup. Unmount the drive after checking the contents in order to continue the modifications.
File Browsers
Every partition on a physical drive show up as a drive in a file browser. Whether in Nautilus, Nemo, Windows File Explorer, Dolphin or another file browser, every partition, or volume, is displayed as a separate disk drive. At one time, every drive had only one partition. Instead of reinventing the wheel, they continued the tradition and display the partitions as drives. While this may not make sense to you, it is good to understand.
While this isn't a complete how to for every instance, I hope it brings understanding so that you are able to accomplish what you intend for your system.